


Stimmen - 4, Durchschnittliche Bewertung: 5
(
 )
)
)
|
Fotos und technische Daten Sony MHC-RG222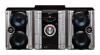 |


Dieses Gerät hat auch andere Anweisungen:
Anleitung Zusammenfassung
Pause Press X. Press again to resume play. Fast-forward or Press m or M. rewind Remove a tape Press PUSH Z on the unit. Searching for the beginning of the current or the next track (AMS)1) To go forward Press > (or turn l L on the unit clockwise) during forward playback. “TAPE A (or TAPE B) >>> +1” appears. Press . (or turn l L on the unit counterclockwise) during reverse playback.2) “TAPE A (or TAPE B) <<< +1” appears. To go back Press . (or turn l L on the unit counterclockwise) during forward playback. “TAPE A (or TAPE B) <<< –1” appears. Press > (or turn l L on the unit clockwise) during reverse playback.2) “TAPE A (or TAPE B) >>> –1” appears. 1) AMS (Automatic Music Sensor) 2) MHC-RG555 only Note The AMS function may not operate correctly under the following circumstances: – When the unrecorded space between songs is less than 4 seconds long. – When the system is placed near a television. Tip When a tape is inserted, corresponding forward (N)/ reverse (n) indicators light. The reverse indicator lights up only for MHC-RG555. Tape Recording Recording your favorite CD tracks on a tape — CD-TAPE Synchro Recording You can record a whole CD on a tape. You can use TYPE I (normal) tape. The recording level is adjusted automatically. Use buttons on the unit for the operation. 1 Load a recordable tape into deck B, then press TAPE A/B repeatedly to select deck B. 2 (MHC-RG555 only) Press PLAY MODE repeatedly to select g to record on one side. Select j (or RELAY) to record on both sides. When you want to record from the reverse side, press hH twice or until the TAPE B reverse side indicator lights up. Then press x. 3 Press CD and load a disc you want to record. If you have already loaded the disc, press DISC SKIP/EX-CHANGE to select the disc. When you want to record an album from an MP3 disc, be sure to press PLAY MODE repeatedly to select ALBM, then press ALBUM – or + to select the desired album before proceeding. 4 Press CD SYNC. Deck B stands by for recording. “REC” flashes. 5 Press REC PAUSE/START. Recording starts. To stop recording Press x. Tape – Play/Tape – Recording continued 19GB To record a disc by specifying track order You can record only your favorite CD tracks using Program Play. Between steps 3 and 4, perform steps 2 to 6 of “Creating your own program” (page 14). Tip For MHC-RG555, if you select both sides recording and the tape reaches the end of the front side part-way through a track, the entire track is recorded again from the beginning of the reverse side. Recording on a tape manually — Manual Recording You can record just the portions you like from a CD, tape or radio program on a tape. You can also record from connected components (see “Hooking up optional components” on page 29). Use buttons on the unit for the operation. 1 Load a recordable tape into deck B, then press TAPE A/B repeatedly to select deck B. 2 (MHC-RG555 only) Press PLAY MODE repeatedly to select g to record on one side. Select j (or RELAY) to record on both sides. When you want to record from the reverse side, press hH twice or until the TAPE B reverse side indicator lights up. Then press x. 3 Press one of the following buttons to select the desired source to record. • CD: To record from this system’s CD player. • TAPE A/B: To record from this system’s tape deck A. • TUNER/BAND: To record from this system’s tuner. • GAME: To record from the connected video game machine to GAME INPUT AUDIO L/R jacks. • VIDEO/MD*: To record from the connected VCR or MD to VIDEO/MD IN jacks. * MHC-RG555 only 4 Press REC PAUSE/START. Deck B stands by for recording. “REC” flashes. 5 Press REC PAUSE/START, then start playing the desired source to record. Recording starts. 20GB To stop recording Press x. Note You cannot listen to other sources while recording. Tips • For MHC-RG555, when you record on both sides, be sure to start from the front side. If you start from the reverse side, recording stops at the end of the reverse side. • For recording from the tuner: If noise is heard while recording from the tuner, move the respective antenna to reduce the noise. Sound Adjustment Adjusting the sound You can reinforce the bass and create a more powerful sound. Press GROOVE on the unit. Each time you press the button, the display changes cyclically as follows: GROOVE ON* t GROOVE OFF * The volume switches to power mode, the equalizer curve changes, and “GROOVE” lights up. Using the sub woofer (MHC-GX750/GX450/RG551S/RG444S/ RX550 only) You can use the sound of the sub woofer to suit the sound source. Press SUB WOOFER ON/OFF on the sub woofer. The indicator lights up while the sub woofer turns on. Press the button again to turn off the sub woofer. Tip You can use VOLUME +/– (or VOLUME control on the unit) to adjust the volume of the sub woofer linked to the front speakers. Sound Adjustment 21GB Selecting the sound effect Selecting the effect from the music menu Press EQ (or PRESET EQ on the unit) repeatedly to select the preset you desire. The preset na...
Dieses Handbuch ist für folgende Modelle:Stereoanlage - MHC-GX250 (531.14 kb)
Stereoanlage - MHC-GX450 (531.14 kb)
Stereoanlage - MHC-GX750 (531.14 kb)
Stereoanlage - MHC-RG555 (531.14 kb)