


Stimmen - 3, Durchschnittliche Bewertung: 4.7
(
 )
)
)
|
Fotos und technische Daten Makita 9032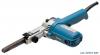 |


Anleitung Zusammenfassung
Adjusting arm inclination The arm can be pivoted and fixed at any desired angle within the "A" range according to the operating position or the figure of the workpiece. Loosen the lock lever by raising it. Pivot the arm to the desired position, and secure the lock lever to fix the arm firmly. Replacing arm By replacing the standard-equipped arm by optional one, 6 mm (1/4") or 13 mm (1/2") width belt can be used. Remove the arm by loosening the screw that secures the arm. Insert thearm that fits thebelttobeused, andtighten thescrew firmly. Switch action CAUTION: • Before plugging in the tool, always check to see that the switch trigger actuates properly and returns to the "OFF" position when released. To start the tool, simply pull the switch trigger. Release the switch trigger to stop. For continuous operation, pull the switch trigger and then push in the lock button. To stop the tool from the locked position, pull the switch trigger fully, then release it. ASSEMBLY 1 1. Speed adjusting dial 001218 Speed adjusting dial The belt speed can be infinitely adjusted between 5 m and 28 m per second (980 -5600 ft./min.) by turning the speed adjusting dial to a given number setting from 1 to 6. Higher speed is obtained when the dial is turned in the direction of number 6; lower speed is obtained when it is turned in the direction of number 1. Select the proper speed for the workpiece to be sanded. CAUTION: • The speed adjusting dial can be turned only as far as 6 and back to 1. Do not force it past 6 or 1, or the speed adjusting function may no longer work. CAUTION: • Always be sure that the tool is switched off and unplugged before carrying out any work on the tool. Installing or removing abrasive belt 001219 Pull the cam lever all the way out. Install the belt over the rear pulley, and slip the belt over the front pulley, with the belt pulled out to the front arm. Return the cam lever to the original position. 001220 Adjusting belt tracking Switch on the tool and make sure that the belt is aligned properly. Use the adjusting dial to center the belt tracking. Turn the adjusting dial clockwise to incline the arm to the right, or counterclockwise to incline it to the left. 1 2 3 4 1. Arm 2. Abrasive belt 3. Cam lever 4. Rear pulley 1 2 1. Arm 2. Adjusting dial 1 2 3 4 1 2 3 4 Dust nozzle 2. Hose 28 3. Hose of vacuum cleaner 4. Vacuum cleaner 1 2 3 1. Dust nozzle 2. Hose 28 3. Dust collector 001221 Connecting to Makita vacuum cleaner or dust collector CAUTION: • Always close the nozzle cap when the vacuum cleaner/ dust collector is not connected to the nozzle. Never insert your finger into the nozzle. Cleaner sanding operations can be performed by connecting the belt sander to Makita vacuum cleaner or dust collector. Open the nozzle cap, and install the dust nozzle. Connect the hose of a vacuum cleaner/dust collector to the dust nozzle. When connecting to Makita vacuum cleaner, an optional hose 28 mm (1-1/8") in inner diameter is necessary. 001222 When connecting to Makita dust collector, connect the hose of the dust collector directly to the dust nozzle. OPERATION "A" range 1 1. Flat shoe 001223 Hold the tool firmly with both hands. Turn the tool on and wait until it attains full speed. Gently apply the tool to the work- piece surface and move the tool forward and back. Press the belt only lightly on the workpiece. Excessive pressure may damage the belt and shorten tool life. Always use "A" range of the belt to sand the workpiece. 001224 001225 CAUTION: • Secure the workpiece with clamps, etc. if there is any possibility of it moving during the work operations. • The tool should not already be in contact with the workpiece surface when you turn the tool on or off. Otherwise a poor sanding finish, damage to the belt of loss of control of the tool may result. • When working with the tool, be very careful to avoid any contact of the tool and belt with any part of your body or anyone or anything near you. MAINTENANCE 001145 1 1. Limit mark 001226 1 2 1. Brush holder cap 2. Screwdriver CAUTION: • Always be sure that the tool is switched off and unplugged before attempting to perform inspection or maintenance. Replacing carbon brushes Remove and check the carbon brushes regularly. Replace when they wear down to the limit mark. Keep the carbon brushes clean and free to slip in the holders. Both carbon brushes should be replaced at the same time. Use only identical carbon brushes. Use a screwdriver to remove the brush holder caps. Take out the worn carbon brushes, insert the new ones and secure the brush holder caps. To maintain product SAFETY and RELIABILITY, repairs, any other maintenance or adjustment should be performed by Makita Authorized or Factory Service Centers, always using Makita replacement parts. ACCESSORIES ACCESSORIES CAUTION: • These accessories or attachments are recommended for use with your Makita tool specified in this manual. The use of any other accessories or attachments might present a risk of injury...