


Stimmen - 5, Durchschnittliche Bewertung: 3.2
(


 )
)
|
Fotos und technische Daten Hyundai H-1617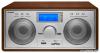 |


Anleitung Zusammenfassung
Be sure that the batteries are inserted correctly to avoid damage to the RC. Always remove the batteries when the RC will not be used for a long period of time, as this will cause leakage to the batteries and subsequently damage to your set. Notes: Use batteries of the same type. Never use different types of batteries together. If the distance required between the RC and the unit decreases, the batteries are exhausted. In this case replace the batteries with new one. Radio operation Automatic tuning • Press the FUNCTION button to select “TUNER” mode. • Press the BAND/TAG button to select AM or FM. • Press the NEXT or PREV button to start automatic tuning process. Manual tuning It is intended for selecting stations, which cannot be tuned automatically (manual selection). To tune a channel manually: • Press the FUNCTION button to select “TUNER” mode. • Press the BAND/TAG button to select AM or FM. • Shortly press the NEXT or PREV button (0.5 second or less), the frequency changes by a fixed step: FM: 0.05 MHz steps/AM: 9 kHz steps. Memory preset • After performing automating tuning, press the MEMORY button to start the preset process. • Display will show the memory sequence number and a flashing “1”. • Press the PRE-UP or PRE-DN button or the MEMORY button of the front panel to determine the preset station number. • Press again the MEMORY button to preset your desired station. • Once all the stations were preset, press the PRE-UP or PRE-DN button to listen to your desired station. Mono/Stereo • Press the MONO/ST. button to achieve the best frequency. 4 USB/SD/MMC operations Playback • Put USB or SD/MMC card to the corresponding port/slot. • Press the FUNCTION button to select “USB/SD” mode. • The LCD will display “READING” while the stereo scans for MP3 from the USB/SD/MMC device total number of the folders of MP3 files and start the playback automatically. • Press the button again to stop playing USB/SD operation temporarily. • Press the button again to resume playback. • Press NEXT button to go to the next track. • When the playback finish, the playback will start to play again from the beginning. Repeat • Press the REPEAT button during playing USB/SD/MMC card, each press switches the repeat function as follows: REPEAT ALL => REPEAT FOLDER => NORMAL PLAYBACK Other functions EQ • Press the EQ button on RC, each press switch the EQ function as follows: CLASSIC => ROCK => POP => JAZZ => BASS - ON => FLAT (normal). ID3 Tag (For MP3 only) • Press once BAND/TAG button, ID3 text will show on display. • Press the button again to terminate ID3 mode. Notes: Due to various solutions, ID3 text function may not be played. Intro • Press the INTRO button during playback to play each song for 10 seconds. • Press the INTRO button again to resume normal playback. Mute • Press the MUTE button to remove the sound during playback. • Press the MUTE button again to resume the sound. . The LCD will display the USB MP3 t t 5 Random • Press the RANDOM button on RC during playback, the unit will select and play a track randomly. • Press the button again to terminate random mode. Sleep • Press the SLEEP button on RC, display will show “SLEEP 90”. That means, after 90 minutes the unit will automatically turn to standby mode. • Press the SLEEP button again to select the automatically turn off time, from 90, 80, 70, 60, 50, 40, 30, 20, 10 minutes. • Press the SLEEP button to “SLEEP 00” to cancel sleep function. Line in (AUX in) Select AUX mode to listen to external audio devices connected through the 3.5 mm Auxiliary Stereo Line-In jack. Press FUNCTION button to select AUX mode. • Use a 3.5 mm Male-to-Male Stereo cable to connect any external audio device with a 3.5 mm Headphone or Ling-Out jack to the AUX IN jack on the rear panel of the stereo. • Start playback on the external audio device. Adjust the volume on the audio device (do not set the volume too high to avoid distortion). You may also adjust the volume on the unit. Clock Setting 1. Press the STANDBY button to switch unit to standby mode. 2. Press the CLOCK button twice to entry clock set mode. The display will show “24H” and flashing. 3. Adjust time format (12H/24H) by pressing the PREV or NEXT button. 4. Press the CLOCK button to confirm time format; display will show “AM” or “PM” if 12H format is set. 5. Adjust hour by pressing the PREV or NEXT button, press the CLOCK button to confirm. 6. Adjust minute by pressing the PREV or NEXT button, press the CLOCK button to confirm. Notes: Because clock setting is at standby mode, the display is dim. Timer setting Timer setting should be preformed after clock setting is completed. 1. Press the STANDBY button to switch unit at standby mode. 2. Press the CLOCK button on RC to entry timer set mode. 3. The display will show “TIMER ON’, press the CLOCK button to entry “TIMER ON” setting. 4. Adjust hour by pressing the PREV or NEXT button, press the CLOCK button to conf...