


Stimmen - 5, Durchschnittliche Bewertung: 3.6
(

 )
)
|
Fotos und technische Daten Hitachi CJ120V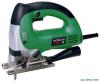 |


Anleitung Zusammenfassung
NAME OF PARTS Housing Stopper Base Switch Trigger Change knob Chip cover Blade Lever Plunger Lever Plunger Blade Housing Base Slide knob Change knob Chip cover Fig. 1 SPECIFICATIONS Motor Single-Phase, Series Commutator Motor Power Source Single-Phase, 120V AC 60Hz Capacity Wood 4-3/4" (120mm) Mind steel 3/8" (10mm) Current 5.8A No-load speed 850 – 3000/min Stroke 1" (26mm) Min. cutting radius 1" (25mm) Weight 5.1 lbs (2.3 kg) English ASSEMBLY AND OPERATION APPLICATIONS . Cutting various lumber and pocket cutting . Cutting mild steel plate, aluminum plate, and copper plate . Cutting plastics, such as phenol resin and vinyl chloride . Cutting thin and soft construction materials . Cutting stainless steel plate (With No. 97 blade) PRIOR TO OPERATION 1. Power source Ensure that the power source to be utilized conforms to the power source requirements specified on the product nameplate. 2. Power switch Ensure that the switch is in the OFF position. If the plug is connected to a receptacle while the switch is in the ON position, the power tool will start operating immediately and can cause serious injury. 3. Extension cord When the work area is far away from the power source, use an extension cord of sufficient thickness and rated capacity. The extension cord should be kept as short as practicable. WARNING: Damaged cord must be replaced or repaired. 4. Check the receptacle If the receptacle only loosely accepts the plug, the receptacle must be repaired. Contact a licensed electrician to make appropriate repairs. If such a fautly receptacle is used, it may cause overheating, resulting in a serious hazard. 5. Confirming condition of the environment: Confirm that the work site is placed under appropriate conditions conforming to prescribed precautions. English 6. Changing blades (1) Open the lever up to the stop. (Fig. 3-I) (2) Remove fitted blade (3) Insert new blade up to the stop in the balde holder. (Fig. 3-II) (4) Close the lever. (Fig. 3-III) CAUTION: . Be sure to switch power OFF and disconnect the plug from the receptacle when changing blades. . Do not open the lever when plunger is moving. NOTE: . Confirm the protrusions of blade inserted to the blade holder surely. (Fig. 4) . Confirm the blade located between the groove of roller. (Fig. 5) 7. Adjusting the blade operating speed The jig saw is equipped with the electric control circuit which enables stepless speed control. To adjust the speed, turn the dial shown in Fig. 6. When the dial is set to “1”, the jig saw operates at the minimum speed (850 /min.). When the dial set to “5”, the jig saw operates at the maximum speed (3000/min.). Adjust the speed according to the material to be cut and working efficiency. CAUTION: . At low speed (dial setting: 1 or 2) do not cut a wood with a thickness of more than 3/8" (10 mm) or metal with a thickness of more than 1/32" (1 mm). 8. Adjusting the orbital operation (1) This Jig Saw employs orbital operation which moves the blade back and forth, as well as up and down. Set the change knob shown in Fig. 7 to “0” to eliminate the orbital operation (the blade moves only up and down). The orbital operation can be selected in 4 steps from “0” to “III”. Blade Lever holder Fig. 3 IIIIIIBlade Blade Blade holder Fig. 4 Blade Blade Roller Roller Fig. 5 Fig.6 CJ120V CJ120VA Dial Dial English (2) For the hard material, such as a steel plate, etc., decrease the orbital operation. For the soft material, such as lumber, plastic, etc., increase the orbital operation to increase work efficiency. To cut the material accurately, decrease the orbital operation. 9. Cutting stainless steel plates This Jig Saw can cut stainless steel plates by using No. 97 blade. Carefully read “Concerning cutting of stainless steel plates” for proper operation. 10. Splinter guard Using the splinter guard when cutting wood materials will reduce splintering of cut surfaces. Insert the splinter guard in the space on the base, and push it completely. (see Fig. 8) 11. Chip cover Chip cover prevents chips from flying off and improves the efficiency of dust collector. Insert the chip cover between the base and lever, and push with a slight pressure until it catches in place. (Fig. 9) When removing chip cover, hold both sides of knob and slightly open until it can be removed from the Jig Saw. (Fig. 10) NOTE: There is a possibility that chip cover is frosted when cutting the metal. 12. Sub base Using the sub base (made from steel) will reduce abrasion of aluminium base especially in cutting metals. Using the sub base (made from resin) will reduce scratching of cut surface. Attach the sub base to the bottom surface of base by attached 4 screws. Fig. 7 Base Change knob Fig. 8 Splinter guard Lever Base Chip cover Chip cover Fig. 9 Fig. 10 English CUTTING CAUTIONS: . In order to prevent blade dislodging, damage or excessive wear on the Plunger, please make sure to have surface of the base plate attached to the work piece while sawing. 1. Rectilinear cutting When cutting...
Dieses Handbuch ist für folgende Modelle:Kreissägen - CJ120VA (1.07 mb)