


Stimmen - 1, Durchschnittliche Bewertung: 3
(

 )
)
|
Fotos und technische Daten Panasonic ER206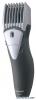 |


Anleitung Zusammenfassung
ER206 IN USA CONTACT: Panasonic Consumer Electronics Company One Panasonic Way 2F-3 Secaucus, NJ 07094 IN PUERTO RICO CONTACT: Panasonic Sales Company Division of Matsushita Electric of Puerto Rico, Inc. San Gabriel Industrial Park 65th Infantry Avenue KM9.5 Carolina, Puerto Rico 00630 En Mexico: Panasonic de Mexico, S.A de C.V. Mexico D.F. Amores 1120, Col. del Valle, 03100 Tel: 54 88 10 00 Service • Assistance • Accessories Call 1-800-338-0552 (In USA) Accessories 1-800-332-5368 (In USA) BPlease read these instructions completely before use, and save this manual for (In USA) future use. No.1 EN ES (U.S.A.) BAntes de usar el aparato, lea completamente las instrucciones y conserve este Printed in China manual para futuras consultas. IMPORTANT SAFETY INSTRUCTIONS When using an electrical appli-including the following. ance, basic precautions Read all instructions before should always be followed, using this appliance. To reduce the risk of electric shock: DANGER 1.Do not reach for the appliance that has fallen into water. Unplug immediately. 2.Do not use while bathing or in a shower. 3.Do not place or store charging adaptor where it can fall into a tub or sink. Do not place in or drop into water or other liquid. 4.Always charge this appliance in a cool, dry place. 5.Except when charging, always unplug the charging adaptor from the electrical outlet. 6.Unplug this appliance before cleaning. To reduce the risk of burns, fire, electric WARNING shock, or injury to persons: 1. Close supervision is necessary when this appliance is used by, on or near children or invalids. 2. Use this appliance only for its intended use as described in this manual. Do not use attachments not recommended by the manufacturer. 3. Never operate this appliance if it has a damaged cord or plug, if it is not working properly, if it has been dropped or damaged, or dropped into water. Return the appliance to a service center for examination and repair. 4.Keep the cord away from heated surfaces. 5. Never charge the appliance on a soft surface such as a bed or couch. 6.Never drop or insert any object into any opening. 7. Do not use outdooors or operate where aerosol (spray) products are being used or where oxygen is being administered. 8. Do not use this appliance with a damaged or broken blade as facial injury may occur. 9. Always attach plug to appliance first, then to outlet. To disconect, turn all controls to “0·Charge” then remove plug from outlet. SAVE THESE INSTRUCTIONS 2 INDEX ENGLISH Page 2 ESPANOL Pagina 9 4 5 1 2 3 4 5 6 7 8 .A .B .C .F .G .H .I .D .E .J .K .L 9 11 10 12 (a) · A few drops in each area indicated with the arrows. · Se colocan unas pocas gotas en cada area indicada con una flecha. Before use This Beard/Hair Trimmer is for the trimming and care of moustaches, beards and hair. Trimming length can be adjusted between 2 to 18mm. The trimmer can be operated either from an AC power source or on its rechargeable batteries (Approx. 50 minutes of use with an 8-hour charge). Parts identification (see fig. 1) A Switch Slide up to turn on, slide down to turn off. B Charge Indicator Lamp Lights when the unit is connected with the adaptor J to an AC power source for charging. C Main Blade A precision 39mm-wide blade which can be used with the comb attachment E. D Quick Adjust Dial Turn the dial to a higher setting to raise or lower the comb attachment E to the desired length (between 2 and 18mm).(see fig. 2) E Comb Attachment Use this to control the trimming length. (see fig. 3) F Stationary Blade G Moving Blade H Cleaning Lever Push this lever to remove bits of hair caught between the stationary blade and the moving blade. I Blade Block Release to remove the blade block from the housing to clean or replace the blade. (see fig. 7) J Adaptor Use this to connect the trimmer to an AC power source for recharging or for AC operation. K Oil Lubricate the space between the stationary and moving blade with 2 or 3 drops of oil after use. (see fig. 9) L Cleaning Brush Trimming length indicator Indicator Trimming Length 1 2.0mm ( 5/64.) 2 3.0mm ( 1/8.) 3 4.5mm ( 3/16.) 4 6.0mm (15/64.) 5 7.5mm (19/64.) 6 9.0mm ( 3/8.) 7 10.5mm (13/32.) 8 12.0mm (15/32.) 9 13.5mm (17/32.) 10 15.0mm (19/32.) 11 16.5mm ( 5/8.) 12 18.0mm ( 3/4.) Operation Rechargeable-battery operation Charge the battery by plugging the trimmer into an AC source using the adaptor. The switch should be set to 0·Charge during charging. An 8-hour charge will provide approx. 50 minutes of use. AC operation Connect the AC adaptor to the body in the same way as for charging, and set the switch to “1” to use the trimmer. If the AC adaptor is connected while the switch is in the “1” position, the trimmer may not operate. If this occurs, set the switch to the “0·charge” position, wait about 1 minute and then set it back to the “1” position. Trimming of Beard Place the angled face of the comb against the skin and cut the beard by moving the trimmer in all directio...