


Stimmen - 0, Durchschnittliche Bewertung: 0
(
 )
)
|
Fotos und technische Daten Philips 7FF2FPA/00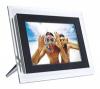 |


Anleitung Zusammenfassung
What is in box 2. Connect 2.1 Attach the Stand 2.2 Connect the power adaptor 3. Setup 3.1 Turn on the photo frame 3.2 Chose Language 4. Enjoy 4.1 View pre-stored photos 4.2 View photos from your memory card 4.3 Copy or copy all photos from your memory card 4.4 Delete or Delete all photos from your memory card 4.5 Copy/ Delete photos by connecting to your computer 4.6 Set Time and Date functions 4.7 Set Auto on/off timer functions 5. Frequently asked questions 6. Service and Warranty 1 Content 1. What is in box Digital PhotoFrame Power adaptor USB Cable to PC (male B type plug) Quick start guide Digital photo display7FFI seriesConnect2Setup3Enjoy1 Quick start guide User manual CD Frame Stand What else you’ll need AC Power outlet Digital Photos on memory card or PC What is in box 2. Connect 2.1 Attach the Stand • Place the head of the stand in the socket. • Rotate counterclockwise until the stand clicks into place. Caution: To help prevent damage, do not hold the frame by the stand. Grasp the frame firmly using two hands. 2.2 Connect the power adaptor • Connect the supplied power adaptor to the photo frame and then plug it to a power outlet. 3. Setup Locate the control keys Control keys on the back of the frame and corresponding function icons on the front of the LCD display enable you to maneuver through the menus and customize your settings. Back/Left Up Enter Next/Right Down Main menu Slide mode Browse Thumnail mode mode Show/Hide Photo Add/Cancel menu menu photo Return Clock Note: Not all of the icons will appear on the screen at the same time. 3.1 Turn on the photo frame • Push the power button on the back of the frame for approximately 2seconds. PhotoFrame (front) Startup screenPhotoFrame (back) Power button ENGLISH Connet / Setup 3.2 Choose language Menu buttons are on the back of the photo frame. Icons indicate location of buttons found on the back of the panel. • Press, keys to select SETTINGS. Presskey to enter. • Press, keys to select Language settings. Presskey to enter. • Press, keys to select. Presskey to set your language. • Usekey to return and exit SETTINGS. PhotoFrame (back)PhotoFrame (front) Language Setting MainMenu OK Up Down Right Left 4. Enjoy 4.1 View pre-stored photos There are 3 view modes to choose from: Browse Mode: manual viewing of photos one by one. Thumbnail Mode: list of all photos. Slide Mode: automatic, rotating display of photos. Setup / Enjoy • Press, keys to select PHOTO. Presskey to enter. • Press, keys to select Internal Memory. Presskey to enter. • Press, keys to select Album. Press key to enter Thumbnail Mode, and presskey to enter Slide Mode, presskey to enter Browse Mode. • You may also enter Slide Mode directly by pressingkey from the main menu. 4.2 View photos from your memory card Use left slot for Secure Digital/MMC/xD/Memory Stick card. Slide card with end first and face up. User right slot for Compact Flash card. Slide card with end first andface down. Photo display (underside) left slot right slot • Press, keys to select PHOTO. Presskey to enter. • Press, keys to select inserted memory card. Presskey to enter. • Press, keys to select Album. Presskey to enter Thumbnail Mode, After a few seconds, photos in your memory card will appear. • Then presskey to enter Slide Mode, presskey to enter Browse Mode. If the memory card is inserted before the power is ON, Slideshow will automatically start. 4.3 Copy or copy all photos from your memory card Copying photo mode 1 • In the thumbnail mode, use, keys to select photo. • Presskey to add/cancel selected photos. After selecting, presskey to show photo menu. 2 Press, keys to select Copy to or Copy all to your memory card. 3 Presskey to copy. Photo frame will keep a resized copy of the photo until it’s internal memory is full (message shown). ENGLISH Enjoy 4.4 Delete or Delete all photos from your memory card Deleting photo mode 1 • In the thumbnail mode, use, keys to select photo. • Presskey to add/cancel selected photos. After selecting, presskey to show photo menu. 2 Press, keys to select Delete or Delete all from your memory card. 3 Presskey to delete. 4.5 Copy/ Delete photos by connecting to your computer You may copy, delete and move photos by connecting the photo framew...
Dieses Handbuch ist für folgende Modelle:Bilderrahmen - 7FF2FPA/27E (1.46 mb)
Bilderrahmen - 7FF2FPA/27B (1.46 mb)
Bilderrahmen - 7FF2FPA/27 (1.46 mb)