


Stimmen - 0, Durchschnittliche Bewertung: 0
(
 )
)
|
Fotos und technische Daten Olympus PT-048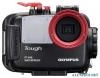 |


Dieses Gerät hat auch andere Anweisungen:
Anleitung Zusammenfassung
When the focus is locked, the AF lock indicator (AFL) appears on the top right of the LCD monitor screen of the camera. To cancel the AF lock, press the OK button (AFL button) again. Selecting the underwater movie mode The underwater mode is available for . TOUGH-8010/STYLUS TOUGH8010 only. Press the ( (REC) button when selecting the underwater mode. EN 21 5. Handling After Shooting 5. Handling After Shooting Wipe off any waterdrop En After completing the shooting and returning to land or a ship, wash lightly in pure water and wipe off any waterdrop sticking to the Case. Use air or a soft cloth not leaving any fibers to thoroughly wipe any waterdrop etc. from the joint between the front and rear lid, the shutter lever, the palm grips, and the open/close dial. CAUTION: When waterdrops remain between the front and the rear lid, they may spill to the inside when the Case is opened. Take special care to wipe off all waterdrops. EN 22 Take out the digital camera Open the Case carefully and take the digital camera out, then remove the adapter from the digital camera. CAUTION: • When opening the Case, take sufficient care that no water will drip from your hair or body onto the Case and the camera. • Before opening the Case, make sure that your hands or gloves are free of sand, fibers, etc. • Do not open or close the Case at locations where there is water spray or sand. • Take care not to touch the digital camera or the battery with hands wet with sea water. En Wash the Case with pure water After use, seal the Case again after taking out the camera and wash it sufficiently in pure water as soon as possible. After using in sea water, it is important to immerse it for a fixed time (30 minutes to 1 hour) in pure water to remove any salt. CAUTION: • Water leakage may occur when a high water pressure is partially applied. Before washing the Case with water, take out the digital camera from it. • Operate the shutter lever and various buttons of this product in pure water to remove salt adhering to the shaft. Do not disassemble for cleaning. • Drying the Case with salt adhered may impair the function. Always wash off any salt after use. Dry the Case After washing with pure water, use a clean cloth to wipe off any waterdrops. Be sure to use a cloth free of salt residue that doesn’t leave any loose fibers. Dry the Case completely at a well ventilated location in the shade. CAUTION: • Do not use hot air from a hair dryer or the like for drying and do not expose the Case to direct sunlight, as this may accelerate deterioration and deformation of the Case and deterioration of the O-ring, leading to leakage of water. • When wiping the Case, take care not to cause scratches. EN 23 6. Maintaining the Waterproof Function 6. Maintaining the Waterproof Function Whenever you open the rear lid of the Case, always be sure to perform En the O-ring maintenance operation as described below. Perform at the location without sand or dust, after washing and drying your hands. Remove the O-ring 1 Insert the O-ring remover between the O-ring and the O-ring groove. 2 Slip the tip of the inserted O-ring remover below the O-ring. (Be careful not to scratch the O-ring groove with the tip of the O-ring remover.) 3 Hold the O-ring with your fingertips after it has come out of the groove and remove it from the Case. Remove any sand, dirt, etc. After visually checking that dirt has been removed from the O-ring, checks for sand and other foreign matter adhered, damage and cracks can be done by squeezing the entire circumference of the O-ring lightly with your fingertips. EN 24 Remove any foreign matter adhered to the O-ring groove using a lint-free clean cloth or cotton swab. Also remove any sand or dirt adhered to the O-ring contact surface on the front lid of the case. En CAUTION: • Maintenance of the waterproof functions is required even before using this product underwater for the first time. • When a sharp object is used to remove the O-ring or to clean the inside of the O-ring groove, the Case and the O-ring may be damaged and water leakage may occur. • Take care not to stretch the O-ring. • Never use alcohol, thinner, benzene or similar solvents or chemical detergents to clean the O-ring. When such chemicals are used, the O-ring may be damaged or its deterioration will be accelerated. EN 25 How to Apply Grease to the O-ring En 1 Apply the exclusive lubricant to each O-ring. Make sure that your fingers and the O-ring are free of dirt, and squeeze about 5 mm of lubricant onto a finger. (5 mm is the most appropriate amount.) 2 Spread the lubricant all over the O-ring. Apply the lubricant with three fingers and spread it over the ring. Be careful not to use force as this may stretch the O-ring. 3 Check that the O-ring is free of scratches or unevenness. After spreading the lubricant, check visually and by touch that the O-ring is not scratched and that its surface is flat. If it is damaged in any way, be sure to replace it with a brand-new O-ring. 4 ...
Dieses Handbuch ist für folgende Modelle:Kameras - PT‑048 (1.15 mb)