


Stimmen - 4, Durchschnittliche Bewertung: 4.8
(
 )
)
)
|
Fotos und technische Daten Scarlett SC-277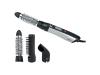 |


Anleitung Zusammenfassung
Ohuavade eemaldatav rest 11. Gaisa novades atverumu nonema restlte 12. loniseerimisfunktsiooni nupp 12. lonizacijas funkcijas taustins 13. Kiiruse indikatsioon 13. Atruma indikacija 14.Temperatuuri indikatsioon 14. Temperatüras indikacija 15. loniseerimise indikatsioon 15. lonizacijas indikacija 16. Tootamise indikatsioon 16. Darba indikacija LT APRASYMAS H LEÍRÁS 1. Korpusas 1. Készülékház 2. Oro srovés greicio jungiklis 2. Gyorsasági fokozat kapcsoló 3. Oro srovés temperatures jungiklis 3. Homérsékletkapcsoló 4. Kilpa pakabinimui 4. Akasztó 5. Rankena 5. Fogantyú 6. Rezimo “SALTAS ORAS” migtukas 6. „HIDEG LEVEGO” kapcsológombja 7. Laido apsaugiklis nuo persiviniavimo 7. Vezeték tekeredését gátló elem 8. Antgalis- koncentratorius 8. Koncentrátor (légterelo) 9. Migtukas (jungti/lsjungti. 9. Fokapcsoló 10. SK-displéjus 10. LCD-kijelzo 11. Ortaki^ ang^ nuimamosios grotelés 11. A légvezeto nyílások leveheto rácsa 12. Jonizacijos funkcijos mygtukas 12. Ionizálás-funkció gombja 13. Greicio indikacija 13. Sebesség jelzése 14.Temperatüros indikacija 14. Homérséklet jelzése 3 SC-277 15. Jonizacijos indikacija 16.Veikimo indikacija KZ СИПАТТАМА 1. Тулга 2. Aya агыныньщ жылдамдыгын ауыстырып ^ос^ышы 3. Aya агыныньщ температурасын ауыстырып ^ос^ышы 4. 1л1п ^оюга арналган ¡лмек 5. Тут^а 6. “САЛ^ЫН АУА” тэрпбшщ ногаты 7. Баудьщ оралып кетушен са^тандыргыш 8. Шашты жайластыргыш 9. K[ocy/©mipy ногаты. 10. СК дисплей 11. Ауа шыгу тестнщ алынбалы торы 12. Иондау ^ызметшщ батырмасы 13. Жылдамдьщ елшеу 14. Кызуды елшеу 15. Ионидалуды елшеу 16.Жумысты елшеу D GARÄTEBESCHREIBUNG 1. Gehäuse 2. Schalter der Geschwindigkeitsstufen des Luftstroms 3. Schalter der Temperaturstufen des Luftstroms 4.Aufhängeschlaufe 5. Griff 6. „Kalte Luft“-Knopf 7. Kabelschutztülle 8. Konzentratordüse 9. Ein-/Ausschaltknopf 10. LC-Display 11. Das abnehmbare Gitter der Luftleitungsröhre 12.Taste der lonisierungsfunktion 13. Geschwindigkeitsanzeige 14.Temperaturanzeige 15. lonisierungsanzeige 16. Betriebsanzeige 15. ionizacio jelzese 16. Muködes jelzese CR opis 1. Tijelo 2. Mjenjac brzine strujanja zraka 3. Mjenjac temperature strujanja zraka 4. Kukica za vjesanje 5. Drska 6. Sklopka rezima “HLADNI ZRAK” 7. Zastita kabela od zapetljavanja 8. Naglavak- koncentrator 9. Tipka Uklj./isklj. 10. LCD displej 11. Resetka zracnih otvora na skidanje 12. Tipka funkcije ionizacije 13. Pokazivanje brzine 14. Pokazivanje temperature 15. Pokazivanje ionizacije 16. Pokazivanje rada 4 SC-277 GB INSTRUCTION MANUAL IMPORTANT SAFEGUARDS • Please read this instruction manual carefully before use. • Before the first connecting of the appliance check that voltage indicated on the rating label corresponds to the mains voltage in your home. • For home use only. Do not use for industrial purposes. Do not use the appliance for any other purposes than described in this instruction manual. • Do not use outdoors. • Always unplug the appliance from the power supply before cleaning and when not in use. • To prevent risk of electric shock, do not immerse the appliance in water or in any other liquids. • Do not take this product into a bathroom or use near water. • Do not spray aerosol products when the hair dryer is in operation. • Close supervision is necessary when it is used near children. • Do not leave the appliance switched on when you do not use it. • Do not use other attachments than those supplied. • Never carry or suspend the appliance by the cord. • Do not operate after malfunction or cord damage. • Do not attempt to repair, adjust or replace parts in the appliance. Repair the malfunctioning appliance in the nearest service center. IMPORTANT: • Keep your hair away from the immediate vicinity of the air inlet opening. Keep air inlet filter dust and fluff free. • Do not cover air inlet or air outlet otherwise the hair dryer may overheat. • The attachments become hot during operation. INSTRUCTION FOR USE • Fully unwind the cord. • Attach a nozzle. • Insert the plug into the power supply. All icons will appear (be displayed) within 3 seconds on the display. • Turn on the hair dryer. • Select desired speed (heating mode) using the speed setting (heat setting) switch. SPEED CONTROL • After increasing the airflow speed there will be displayed the following icons: - LOW - cold airflow; - MED - medium speed for more delicate drying and styling; - HIGH - high speed for quick drying and styling. HEAT SETTINGS • After increasing the airflow temperature there will be displayed the following icons: - LOW - cold airflow; - MED - warm airflow; - HIGH - hot airflow. CONCENTRATOR • The air concentrator is for bundling and directing the airflow for selective drying. IMPORTANT: Airflow speed will be increased automatically after increasing the airflow temperature IONIZATION FUNCTION • The built in ionizer prevents generation of ...