


Stimmen - 2, Durchschnittliche Bewertung: 4
(

 )
)
|
Fotos und technische Daten Senco DS200-AC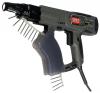 |


Anleitung Zusammenfassung
. Nosepiece has settings; . La boca puede configurarse en seis posibles; . Il y a possibles du nez ; . To tighten screw,depress the nosepiece using slight pressure. Tighten the screw, making sure it is snug against the slidebody. . Para apretar el tornillo, presione la pieza de la boca ejerciendo ligera presion. Apriete el tornillo, asegurandose de que calce bien contra el cuerpo deslizable. . Pour serrer la vis, imprimez une legere pression sur le nez. Serrez la vis en vous assurant qu’elle est bien ajustee contre la partie coulissante. . (1) Hold tool upright. Insert the new bit into the slide body. (2) Pull bit release button to rear. (3) Pulse tool and release button when bit drops into place. . (1) Sostenga la herramienta en posicion recta. Inserte la nueva broca en el cuerpo seslizante. (2) Tire de boton de liberacion de la broca hacia atras. (3) Pulse el boton y liberelo cuando la broca calce en su posicion. . (1) Tenez l’outil vers le haut. Inserez la nouvelle broche dans son logement. (2) Appuyez sur la gachette et relachez une fois la broche en position. 1'' 1st hole 25mm 11/4'' 2nd hole 32mm 11/2'' 3rd hole 38mm 15/8'' 4th hole 41mm 13/4'' 5th hole 44mm 2'' 6th hole 50mm DS200-AC 1'' 1°orificio 25mm 11/4'' 2°orificio 32mm 11/2'' 3°orificio 38mm 15/8'' 4°orificio 41mm 13/4'' 5°orificio 44mm 2'' 6°orificio 50mm DS200-AC 1'' 1st trou 25mm 11/4'' 2nd trou 32mm 11/2'' 3rd trou 38mm 15/8'' 4th trou 41mm 13/4'' 5th trou 44mm 2'' 6th trou 50mm DS200-AC . Changing the bit: Due to wear or damage, the bit will need to be replaced periodically or when changing from Phillips to Square Drive fasteners. . Cambio de la broca: La broca se debera reemplazar periodicamente a causa del desgaste o danos o cuando se cambia de tornillos Phillips a tornillos para broca de punta cuadrada. . Changement de la broche : La broche doit etre remplacee periodiquement en raison d’usure ou de dommage ou de changement entre vis a tete Phillips ou carrees. . Remove fasteners from the tool. (1) Pull bit release button to rear. (2) Tilt tool forward and pulse motor. Bit will fall out. . Retire los tornillos de la herramienta. (1) Tire de boton de liberacion de la broca hacia atras. (2) Incline la herramienta hacia adelante y mueva el motor a pulso. La broca caera. . Retirez les vis de l’outil. (1) Tirez le bouton de liberation de la broche vers l’arriere. (2) Inclinez l’outil vers le bas et faites tourner le moteur. La broche doit tomber. Maintenance . Mantenimiento . Entretien English Espanol Francais . Read section titled “Safety Warnings” before maintaining tool. . Lea la seccion titulada “Avisos de Seguridad” antes de darle mantenimiento a la herramienta. . Lisez la section intitulee “Consignes de Securite” avant d’effectuer l’entretien de l’outil. . With tool unplugged from electrical supply, make daily inspection to assure free movement of nosepiece and trigger. Do not use tool if nosepiece or trigger sticks or binds. . Desenchufe la herramienta de la fuente de alimentaciun electrica, efecte la inspecciun diaria para asegurar el movimiento libre de la pieza de la boca y el accionador. No use la herramienta si la pieza de la boca o el accionador se quedan pegados o unidos entre si. .Alors que lioutil est debranche, faites une inspection quotidienne pour vous assurer que la detente et liextremite rotative bougent librement.N’utilisez pas l’outil s’il y a blocage ou grippage du nez ou de la gachette. R . Routine lubrication of the attachment is not necessary. Do not oil. . Follow manufacturers recommendations for the screwdriver. . La lubricacion de rutina no es necesaria. No aceite. . Respete las recomendaciones de los fabricantes para la herramienta colocadora de tornillos. . La lubrification de routine n'est pas necessaire. N'huilez pas. . Suivez les recommandations du fabricant du tournevis electrique. . Wipe tool clean daily and inspect . Limpie la herramienta frotandola . Nettoyez l’outil chaque jour a for wear. e inspeccione para ver si hay desgaste. l’aide d’un chiffon et inspectez-le pour deceler une eventuelle usure. 11 Troubleshooting . Identificacion de Fallas . Depannage Problem or Symptom Probable Cause Corrective Action Tool will not start or runs slowly. Trigger switch is defective. No electrical power. Return to Senco. Check electrical suppy. (fuse) Tool will not drive screw into desired substrate. Bit is worn. Power capabilities of the tool have been exceeded. Replace bit. Refer to operators manual for appropriate applications. Tool does not fully drive fastener. Depth of drive not set properly. Bit is worn or clogged. Adjust depth of drive for deeper penetration. Replace or clean bit. Tool does not advance fastener. Screw length is improperly set. Return spring is weak. Defective collation material. Worn sprocket. Refer to operators manual for proper adjustment of screw length. Return to authorized SENCO service representative. Screws fall out of collation during drive. Screw length improperly set. Bit guide has...