


Stimmen - 5, Durchschnittliche Bewertung: 4.6
(
 )
)
)
|
Fotos und technische Daten American Audio MCD-110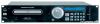 |


Anleitung Zusammenfassung
7. PITCH PERCENTAGE SELECTOR -Choose from pitch percentages of 4%, 8%, and 16%. See page 28 for more details. 8. PITCH SLIDER -This slider is used to adjust the playback pitch percentage when the PITCH (9) function is activated. The slider is a set adjustment and will remain set until the pitch slider is moved or the PITCH (9) function has been turned off. This adjustment can be made with or without a CD in the drive. The pitch adjustment will remain even if a disc has been remove, and will reflect on any other disc loaded into the unit. That is to say, if you set a +2% pitch on one disc, remove that disc and insert another, that disc too will have a +2% pitch. The amount of pitch being applied will be displayed in the LCD (4). Use this slider to match the BPM’s of this unit to that of another music source. By changing the pitch of one disc with respect to the other in this way, the beats can be matched. 9. PITCH BUTTON -This button is used to turn the pitch function on and off. The pitch functions of the PITCH SLIDER (8), PITCH BEND BUTTONS (10) and JOG WHEEL (2) will not function without this function being activated. The LED will glow when the pitch function is activated. See PITCH on page 16. 10. PITCH BEND BUTTONS (-) PITCH BEND -The (-) pitch bend function creates a momentary “Slow Down” in the CD’s pitch speed (Beats per minute - BPM) when the PITCH (9) function is activated. This functions allows the beats between two CD’s or any other music source to match. This is a momentary function. When the button is depressed the pitch speed will automatically return to PITCH SLIDER'S (8) selected pitch. Holding down this button will give a maximum of -16% pitch. Be sure to remember that this function is a momentary pitch adjustment, for a more precise adjustment use the PITCH SLIDER'S (8) to match the BPM’s with another playing music source. (+) PITCH BEND -The (+) pitch bend function creates a momentary “BUMP” in the CD’s pitch speed (Beats per minute - BPM) when the PITCH (9) function is activated. This functions allows the beats between two CD’s or any other music source to match. This is a momentary function. When the button is depressed the pitch speed will automatically return to PITCH SLIDER'S (8) selected pitch. Holding down this button will give a maximum of +16% pitch. Be sure to remember that this function is a momentary pitch adjustment, for a more precise adjustment use the PITCH SLIDER'S (8) to match the BPM’s with another playing music source. 11. TIME -The time button is used to changed the way the time values are displayed in the LCD (4). The time value can be displayed as elapsed track time or remaining track time. ©American Audio® --MCD-110™ Instruction Manual Page 9 FUNCTIONS AND CONTROLS FUNCTIONS AND CONTROLS SEARCH BUTTONS This search button allows you to quickly scan backwards through a track. This search button allows you to quickly scan forwards through a track. 13. TRACK BUTTONS This button is used to select a track. Tapping this button will back-skip to the previous track, holding down this button will rapidly back- skip through the tracks on a CD. This button is used to select your desired track. Tapping this button will forward skip to the next track, holding down this button will rapidly forward skip through the tracks on your CD. 14. RELOOP BUTTON -If a LOOP has been made (see setting a LOOP on page 17), but the CD Player is not actively in LOOP mode (a loop is not playing), pressing the RELOOP BUTTON will instantly reactivate the LOOP. To exit loop, press the OUT BUTTON (15). LOOP and RELOOP will appear in the LCD DISPLAY (4) when the RELOOP function is available. 15. LOOP OUT BUTTON -This button is used to set the ending point of a loop. A loop is started by pressing the IN BUTTON (3), pressing the OUT BUTTON set the loop ending point. The loop will continue to play until the OUT BUTTON is pressed once again. 16. PLAY/PAUSE BUTTON -Each press of the PLAY/PAUSE Button causes the operation to change from play to pause or from pause to play. While in play mode the green play LED will glow, and while in pause mode the green play LED will flash. 17. CUE -Pressing the CUE button during playback immediately pauses playback and returns the track to the last set cue point (see setting a CUE POINT, page 18). 18. OPEN/CLOSE (TRANSPORT TRAY OPEN/ CLOSE) -This button is used to open and close the transport tray. NOTE: The TRANSPORT TRAY (1) will not open when a CD is already inserted, unless the drive mechanism is in “Pause” or “Cue” mode to prevent accidentally stopping the music during playback. 19. POWER SWITCH -This switch is used to control the unit's main power. 20. AUDIO OUT R & L -These jacks are used to send a left and right output signal. Use these jacks to send an audio signal to a mixer or receiver. The red colored jack represents the right channel output and white jack represents the left channels output. Used together these signal reproduce a stereo si...