


Stimmen - 4, Durchschnittliche Bewertung: 3.8
(

 )
)
|
Fotos und technische Daten Yamaha YST-SW160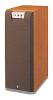 |


Dieses Gerät hat auch andere Anweisungen:
Anleitung Zusammenfassung
• Amplifier line output terminals are generally labeled PRE OUT or SUBWOOFER OUT. • To connect with a YAMAHA DSP amplifier, connect the SUBWOOFER (or LOW PASS etc.) terminal on the rear of the DSP amplifier to either the left (L) or right (R) INPUT 2 terminal. Using one unit This unit OUTPUT INPUT2 AUTO Left speaker Right speaker Using two units This unit This unit To AC outlet To AC outlet Amplifier Right speakerLeft speaker Pin plug cords OUTPUT INPUT2 PHASE BASS TO SPEAKERS INPUT1 FROM AMPLIFIER LOW HIGH AUTO STANDBY NOM REV MOVIE MUSIC OFF OUTPUT INPUT2 PHASE BASS TO SPEAKERS INPUT1 FROM AMPLIFIER LOW HIGH AUTO STANDBY NOM REV MOVIE MUSIC OFF POWER ON OFF POWER ON OFF OUTPUT INPUT2 PHASE BASS TO SPEAKERS INPUT1 FROM AMPLIFIER LOW HIGH AUTO STANDBY NOM REV MOVIE MUSIC OFF OUTPUT INPUT2 PHASE BASS TO SPEAKERS INPUT1 FROM AMPLIFIER LOW HIGH AUTO STANDBY NOM REV MOVIE MUSIC OFF Notes on the above connections • When connected to line output terminals of the amplifier, other speakers should not be connected to the OUTPUT terminals on the rear panel of the subwoofer. If connected, they will not produce sound. • When connecting this unit to a monaural line output terminal of the amplifier, connect to either the left or right INPUT 2 terminal. • For using a power amplifier and a preamplifier, the preamplifier must have two sets of PRE OUT terminals. If your preamplifier has only one set of PRE OUT, connect this unit to the speaker terminals. (See page 4.) CONTROLS AND THEIR FUNCTIONS CONTROLS AND THEIR FUNCTIONS English STANDBY/ON HIGH CUT VOLUME 140 Hz 0 10 40 Hz 140 Hz 0 10 40 Hz 150 Hz 0 10 50 Hz YST-SW160 YST-SW90 STANDBY/ON HIGH CUT VOLUME STANDBY/ON HIGH CUT VOLUME Y!.Y!.~~ Rear panel OUTPUT INPUT2 PHASE BASS TO SPEAKERS INPUT1 FROM AMPLIFIER LOW HIGH AUTO STANDBY NOM REV MOVIE MUSIC OFF POWER ON OFF OUTPUT INPUT2 PHASE BASS TO SPEAKERS INPUT1 FROM AMPLIFIER LOW HIGH AUTO STANDBY NOM REV MOVIE MUSIC OFF POWER ON OFF ¤#‹ @ ~Power indicator Lights up while this unit is ON. * If the AUTO STANDBY switch on the rear panel is set to the LOW or HIGH position, this indicator is illuminated dimly when no signal is input to this unit. YSTANDBY/ON button Each press of this button turns the unit on and off (on standby). A small amount of power is always consumed even while this unit is on standby. !HIGH CUT control Adjusts the high frequency cut off point. Frequencies higher than the frequency selected with this control are all cut off (and not output). .VOLUME control Adjusts the volume level. @Main POWER switch Normally, leave this switch to the ON position. When you will not use this unit for a long period, set this switch to the OFF position. ¤AUTO STANDBY switch With this switch, you can activate the Automatic Standby function. Normally, set the switch to the LOW position. To cancel this function, set the switch to the OFF position. * Change the setting of this switch only when the power of this unit is on standby (by setting the STANDBY/ON button to OFF). Automatic Standby function When you play a source, the power of this unit turns on automatically by sensing audio signals input to this unit. This unit turns into the standby mode automatically if the source being played is stopped or the low frequency input signal is cut off for several minutes. This function will operate by sensing a certain level of low frequency input signal. Its sensitivity is high in the HIGH position and low in the LOW position of the AUTO STANDBY switch. In the HIGH position, the power will turn on even with a low level of input signal, but on the other hand this unit may not turn into the standby mode when there is an input signal even if its level is extremely low. * There may be a case that the power turns on unexpectedly by sensing noise from other appliances. If it occurs, set the AUTO STANDBY switch to the OFF or LOW position. * The level of low frequency input signal differs with each source, and each different part on the same source. So, this function may not operate properly depending on some sources. This function is available only when the power of this unit is on (by setting the STANDBY/ON button Yto ON). #PHASE switch Normally this switch is to be set to the REV (reverse) position. However, according to your speaker systems or the listening condition, there may be a case when better sound quality is obtained by setting this switch to the NOM (normal) position. Select the better position by monitoring the sound. ‹BASS switch By setting this switch to the MOVIE position, the bass sound in video software is well reproduced. By setting it to the MUSIC position, the bass sound in audio software is well reproduced. YST-SW160 only 7 ADJUSTING VOLUME ADJUSTING VOLUME Front panel Rear panel YST-SW160 YST-SW90 STANDBY/ON HIGH CUT VOLUME STANDBY/ON HIGH CUT VOLUME 140 Hz 0 10 40 Hz 150 Hz 0 10 50 Hz PHASE NOM REV 3 51,6 3 51,6 7 1 Set the VOLUME control to minimum (0). 2 Turn on the other components. 3 Press the STANDBY/ON button to ...
Dieses Handbuch ist für folgende Modelle:Lautsprecher und Subwoofer - YST-SW90 (340.13 kb)